flask程序在云服务器运行方法
本地存储
使用localStorage进行存储,其数据不会随着重启app清楚,只有当用户手动清楚数据时数据清空。
云服务器存储
安装Anconda3+Python
系统:centos7
Tips:使用
Ctrl+Insert复制Linux的文字、使用Shift+Insert粘贴到Linux
由于该博主介绍详细,这里只列出使用的代码、以及部分遇到的问题:
sudo yum install wget  # 安装wget
wget https://repo.anaconda.com/archive/Anaconda3-2024.06-1-Linux-x86_64.sh  # 运行脚本
chmod +x Anaconda3-2024.06-1-Linux-x86_64.sh  # 给脚本赋权
./Anaconda3-2024.06-1-Linux-x86_64.sh  # 运行脚本,注意:最后`conda init --reverse $SHELL`? [yes|no]的选项,选择yes以便添加path环境
source ~/.bashrc  # 是重新加载当前用户的 .bashrc 文件,使path环境生效
conda create -n python11 python=3.11  # 安装python虚拟环境
conda activate python11  # 激活环境
Flask程序部署
本节参考:如何快速入门部署自己的Flask程序
-
准备flask程序
-
去防火墙开放5000端口
-
将本地的app.py文件上传到云服务器的root文件夹下
绑定内网IP:
app.run(host="xxx.xx.xx.xxx", port=5000, debug=True) -
cd到文件夹内
-
安装requirements.txt
pip install -r requirements.txt -
python app.py
# app.py

from flask import Flask, request, jsonify
from flask_cors import CORS
from datetime import datetime

app = Flask(__name__)
CORS(app, supports_credentials=True)  # 允许跨域


# 模拟数据库
clock_in_records = []
# 添加打卡内容的 API
@app.route('/api/addClockIn', methods=['POST'])
def add_clock_in():
    data = request.get_json()
    # 验证打卡内容
    if 'content' not in data or not data['content']:
        return jsonify({"message": "打卡内容不能为空"}), 400
    # 将打卡内容保存到“数据库”
    new_record = {
        "content": data['content'],
        "createdAt": datetime.now().strftime("%Y-%m-%d %H:%M:%S")
    }
   clock_in_records.append(new_record)
    print(clock_in_records)
    return jsonify({"message": "打卡成功", "record": new_record}), 201

if __name__ == '__main__':
    app.run(host="xx.xx.xx.xx", port=5000, debug=True)   # 重点!需填写内网地址、和开放的端口
Flask程序高并发运行
本节参考:flask中gunicorn的使用
-
安装
pip install gunicorn,以通过多进程方式提供高性能的请求处理 -
编写
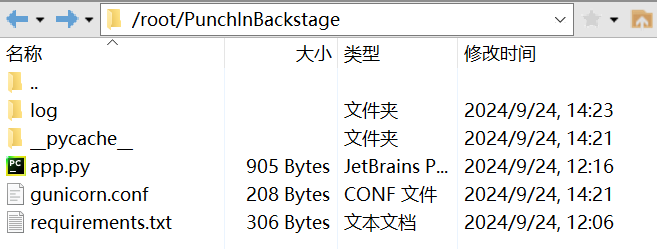
gunicorn.conf文件,与app.py存放在同一目录,并在该目录中创建log相关文件,内容如下:

# gunicorn.conf bind = "0.0.0.0:5000" # 监听所有网络接口,端口为5000 workers = 4 # 启动四个工作进程,适合高并发 backlog = 2048 # 设置等待连接的最大请求数量 pidfile = "log/gunicorn.pid" # 指定 Gunicorn 的进程ID文件路径 accesslog = "log/access.log" # 记录访问日志的文件路径 errorlog = "log/debug.log" # 记录错误日志的文件路径。 timeout = 600 # 设置请求超时时间为 600 秒。 debug=False # 设置为 False,表示不启用调试模式 capture_output = True # 捕获标准输出和错误输出,并将其写入日志文件 -
运行代码:
gunicorn --config gunicorn.conf app:app
使用域名访问api-Nginx反向代理
- 安装Nginx:
sudo yum install nginx - 创建一个新的 Nginx 配置文件,放在
/etc/nginx/conf.d/romcere.conf,内容如下:
server {
    listen 80;
    server_name romcere.top;

    location / {
        proxy_pass http://127.0.0.1:5000;  # Gunicorn 的地址
        proxy_set_header Host $host;
        proxy_set_header X-Real-IP $remote_addr;
        proxy_set_header X-Forwarded-For $proxy_add_x_forwarded_for;
        proxy_set_header X-Forwarded-Proto $scheme;
    }
}
- 启动并启用Nginx:
sudo systemctl start nginx
sudo systemctl enable nginx
https访问api
如果你的域名拥有SSL证书(或可获取免费SSL证书),请继续阅读:
- 上传SSL证书和私钥到任一文件夹内
- 打开 Nginx 配置文件,更新以下内容:
server {
    listen 80;
    server_name www.romcere.top romcere.top;
    return 301 https://$host$request_uri;  # 将 HTTP 请求重定向到 HTTPS
}
server {
	listen 443 ssl;
    server_name www.romcere.top romcere.top;
	ssl_certificate /etc/ssl/romcere-top/romcere.top_bundle.crt;  # 替换为你的证书文件路径
    ssl_certificate_key /etc/ssl/romcere-top/romcere.top.key;  # 替换为你的私钥文件路径
    location / {
        proxy_pass http://127.0.0.1:5000;  # Gunicorn 的地址
        proxy_set_header Host $host;
        proxy_set_header X-Real-IP $remote_addr;
        proxy_set_header X-Forwarded-For $proxy_add_x_forwarded_for;
        proxy_set_header X-Forwarded-Proto $scheme;
    }
}
后台运行Flask程序-systemd守护进程
systemdw为Linux自带,无需安装
-
创建一个
systemd服务文件,放在/etc/systemd/system/gunicorn.service,内容如下:WorkingDirectory:工作目录,只到后端文件的目录即可Environment:python程序ExecStart:这里为gunicorn运行命令,需更换前者文件位置
[Unit]
Description=Gunicorn instance to serve your app
After=network.target

[Service]
User=root
Group=nginx
WorkingDirectory=/root/PunchInBackstage
Environment="PATH=/root/anaconda3/envs/python11/bin"
ExecStart=/root/anaconda3/envs/python11/bin/gunicorn --config /root/PunchInBackstage/gunicorn.conf app:app

[Install]
WantedBy=multi-user.target
- 启用并启动 Gunicorn 服务:
sudo systemctl enable gunicorn  # 设置系统启动时自动启动,
sudo reboot  # 重启服务器
sudo systemctl status gunicorn  # 查看gunicorn状态,检查是否启动
# 如果修改了gunicorn.service文件,需重载并重启gunicorn服务
sudo systemctl daemon-reload  # 重载配置文件
sudo systemctl restart gunicorn  # 重启gunicorn服务
------------------------------------------------------------
sudo systemctl start gunicorn  # 启动gunicorn服务
sudo systemctl stop gunicorn  # 停止gunicorn服务
可能遇到的问题
-
当更改python代码后,需要安装新模块时:
source /root/anaconda3/bin/activate python11  # 先激活环境
pip install mysql-connector-python  # 再安装
sudo systemctl restart gunicorn  # 重启gunicorn服务
sudo systemctl status gunicorn  # 查看gunicorn状态
###MySQL-数据持久化存储
本节参考:在 Centos7 环境安装 MySQL
由于
Flask-SQLAlchemy只支持SQLite,而SQLite只能生成本地文件,需要通过本地访问,于是使用MySQL
-
下载MySQL包:
wget http://repo.mysql.com/mysql57-community-release-el7-10.noarch.rpm -
安装MySQL源:
rpm -Uvh mysql57-community-release-el7-10.noarch.rpm -
安装MySQL服务端:
yum install -y mysql-community-server可能出现的问题: Failing package is: mysql-community-libs-5.7.44-1.el7.x86_64
GPG Keys are configured as: file:///etc/pki/rpm-gpg/RPM-GPG-KEY-mysql解决方法:在终端输入
rpm --import https://repo.mysql.com/RPM-GPG-KEY-mysql-2022即可,然后重新安装MySQL服务端 -
可使用
sudo systemctl start mysqld直接启动MySQL服务(可选)或者启用MySQL自启动:
sudo systemctl enable mysqld
使用sudo reboot重启服务器,重新连接后输入sudo systemctl status mysqld检查MySQL服务是否自启动 -
输入
grep 'temporary password' /var/log/mysqld.log查看MySQL临时密码 -
登录MySQL:
mysql -uroot -p,输入刚刚获得的临时密码 -
重置密码:
# 输入下述可将密码规则简单化
set global validate_password_policy=0;
set global validate_password_length=1;
# 输入下述设置重置本地用户密码,`xxxxxx`为密码
ALTER USER 'root'@'localhost' IDENTIFIED BY 'xxxxxx';

# (可选)若想要以外部软件连接此MySQL,需要再设置允许所有用户连接MySQL
CREATE USER 'root'@'%' IDENTIFIED BY 'xxxxxx';
GRANT ALL PRIVILEGES ON *.* TO 'root'@'%' WITH GRANT OPTION;
FLUSH PRIVILEGES;
最后输入
\q退出MySQL
可能出现的问题
ERROR 2002 (HY000): Can't connect to local MySQL server through socket '/tmp/mysql.sock' (2)
# 此问题常见原因:MySQL服务未启动、套接字未关联
解决方法:通过tcp连接:mysql -u root -p -h 127.0.0.1
# 个人遇到的原因:重新安装MySQL时,其文件未完全清除
解决方法:建议重新安装系统来解决
---------------------------------------------------------
ERROR 1045 (28000): Unknown error 1045
# 密码错误
解决方法:通过grep 'password' /var/log/mysqld.log,查看临时密码
MySQL常见操作
sudo systemctl status mysqld  # 检查MySQL服务状态:
sudo systemctl start mysqld  # 启动MySQL服务:
sudo systemctl stop mysqld  # 停止MySQL服务:
sudo systemctl restart mysqld  # 重启MySQL服务:
----------------------------------------------
sudo systemctl enable mysqld  # 启用MySQL自启动:
sudo systemctl disable mysqld  # 禁用MySQL自启动:
